Sites@Duke Express: What happens to your Sites@Duke site when you leave Duke?
If you are a graduating student, a faculty or a staff member leaving Duke (and therefore will no longer have an active Duke NetID), you have several options for your site, depending on your desired outcome.
Course Sites
1. If you want to make access changes to a site related to an academic course…
Per the Sites@Duke Retention Policy, academic sites remain on Duke’s server for 5 years.
Unless you changed the Site Visibility settings to a Subsite that you created in a class (Dashboard > Settings > Reading Settings), the default setting is that the site is only viewable to the members of your class.
Consult with the faculty member who taught your course if you have any questions or concerns about your site.
Non-Course Sites
1. If you want to keep your site active and available after you leave…
You can export your Sites@Duke WordPress site and move it to another WordPress instance by following these steps:
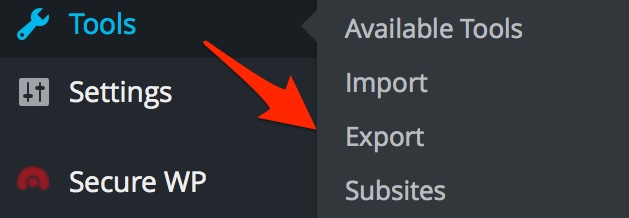
- On your Sites@Duke Dashboard, use the menu bar on the left side to navigate to Tools and then Export.

- If you want to export your entire site, select ‘All content’, which is the default option, and click the button to ‘Download Export File’.
- If a dialog box pops up, select 'Save File' and click 'Ok'.
- This should download a .xml file into the default folder your computer uses for files downloaded through your browser.
- Log into, or create, your WordPress account at https://wordpress.com/ and create or navigate to your site that you would like to transfer your Sites@Duke site to.
- Once you are logged into your non-Duke Wordpress site, navigate to the Dashboard by adding '/wp-admin' to the end of your non-Duke site's URL [For example: testsite.wordpress.com/wp-admin].
- Once on the Dashboard of your WordPress instance site, navigate again to Tools, this time selecting Import.

- NOTE: If this option does not appear in the menu bar, copy and paste this link in your browser: https://*******.wordpress.com/wp-admin/import.php Replace the ****** with the name of your WordPress site (found in the URL as https://******.wordpress.com)
- On the Import page, find ‘WordPress’ in the list of options and click 'Run Importer' underneath it.
- Click 'Browse' and select the .xml file from Step 4 from your default downloads folder.
- Click 'Upload file and import'.
- Assign authors to your posts/content as necessary.
- WordPress will process your site and send you an email when it is finished being processed and uploaded.
2. If you want your site to expire and disappear after you leave…
If you don’t need or want to access your site after you leave Duke, you can leave it up and it will eventually expire and be deleted.
Alternatively, you can delete your site with the following steps:
-
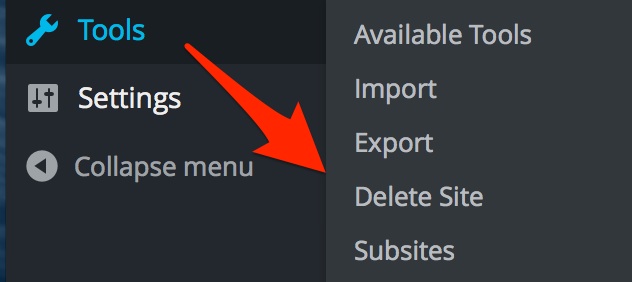
- On your Sites@Duke Dashboard, use the menu bar on the left side to navigate to Tools and then Delete Site.

- You must check the box that acknowledges that your site will be permanently deleted and can never be recovered – DO NOT delete your site if you are unsure whether you would like to access it again!
- If you are sure, click the button that says ‘Delete my site permanently’.
- Once you do this, you will receive an email to your Duke email address asking you to confirm that you’d like to delete your site – click the link in this email to permanently remove your site. If you do not click this link, your site will NOT be deleted.
- On your Sites@Duke Dashboard, use the menu bar on the left side to navigate to Tools and then Delete Site.
3. If you want your site to continue at Duke without you, after you leave…
You can add another member of the Duke community to your site as an Administrator. For example, if you are the President of a club, you can add the future president as the new Admin so he or she will be able to access and update the site when you leave Duke.
NOTE: It is best practice to have a second administrator on your site. Student groups should be adding their advisor.
To add a User to your site, consult the following articles, though the process is essentially the same:
4. You don’t want anyone to see your site or find it through searching the web….
- Go to Dashboard > Settings > Reading Settings to check your settings.
- Check “I would like my site to be visible only to Admins” so that only you (and any other Admins) can see the site and no one else.
- Click Save Changes
---
As a general reminder, sites on Sites@Duke Express need to be renewed every 2 years by an administrator otherwise they will be soft deleted for 6 months and then permanently deleted after that and generally not recoverable.
Questions? Contact the OIT Service Desk, http://oit.duke.edu/help/.
Article number: KB0025519
Valid to: August 1, 2027